Author Archives: isatools

Towards a new Sequence Logo Visualization

Diverging somewhat from our normal posts is a post about a new visualization developed in our group.

Eamonn is at EuroVis 2014 in Swansea this week where he will be presenting a paper viewable here Redesigning the Sequence Logo with Glyph-based Approaches to Aid Interpretation on the redesign of the infamous Sequence Logo, some screenshots which you can see below. It supports:

  1.  multiple sequence groups for comparison;
  2. entropy or frequency based encoding of bar size;
  3. glyphs to show changes in position preference for hydropathy or charge;
  4. GestaltLine glyph to show overview of variation at a position; and
  5. Customisation to:
    1. reduce transparency of positions where variability is high; or
    2. show the consensus sequence.
Screen Shot 2014-05-14 at 11.48.11

Sequence logo with entropy encoding.


Screen Shot 2014-05-14 at 11.49.17

Sequence logo with frequency based encoding and showing detail on demand view on position hover.


Everything, as always, is open source and available with examples on our GitHub repository

https://github.com/ISA-tools/SequenceLogoVis

. Let us know what you think, what should be improved, etc. via our issue tracker. The paper is available here and the presentation will be online soon!

BioSharing Profiles automatically assign data with publications

A while ago, we went along to the ORCID codefest at St. Anne’s College, Oxford.

In the day or two of coding, Alejandra won with her entry in adding ORCID functionalities to ISAcreator.

In my entry, I created a system that presented article impact metrics from ImpactStory and also automatically pulled ArrayExpress and PRIDE data links for  publications. The advantages being that users don’t have to go looking for the data for a publication across many repositories. Take this example from ArrayExpress, E-GEOD-31453 – from the submission, you’d never know that there were other data submissions directly related to this submission in ArrayExpress or elsewhere, e.g. E-GEOD-27713. The component developed for BioSharing, but could be used by anyone takes a PubMed ID or DOI and finds the data available in public repositories relating to that publication. It’s use is illustrated in one of the profiles for one of our latest BioSharing users, Sheng-Da Hsu. You can see a screenshot of his publications section below, or see it for yourself here.

78fb397

Screen Shot 2013-11-14 at 17.41.11

Getting up and running with the BII Web Application

In true Star Wars fashion, we are bringing you the prequel to the last blog post discussing how to set up data file access from your JBoss installation. In this post we’ll discuss how to set up the BioInvestigation web application, from build to deployment.

1. Getting Ready

  • First, you’ll need to have a Java installed.
  • Then you’ll need to download Maven, this is what automates the build process for the BII web application. A bit like Ant, but it adds dependency management, meaning no need for pesky lib directories. Why this version I hear you ask? Well for some silly reason, the Maven developers (as great as they are) thought that removing the ability to specify profiles in profiles.xml was a great idea. We don’t think it is. In Maven 3+ you can only specify profiles in the pom.xml file or in the settings.xml file under the .m2 directory on your system. So, use version 2.2.1. We’ll move on to configuring these profiles a little later.
  • Now you need Git which we’ll use to get the latest BII codebase from GitHub. If you haven’t heard of Git, you simply haven’t lived. Get out from underneath that SVN rock and join the Git revolution. It’s worth migrating just for the benefit of GitHub or some other funky equivalent (BitBucket or Launchpad).
  • Next, download JBoss 5.1.0 from http://sourceforge.net/projects/jboss/files/JBoss/JBoss-5.1.0.GA and move the JBoss directory to somewhere to your liking. For further examples, let’s say that’s /etc/jboss-5.1.0.GA/ for the rest of this post.
  • Finally, if you want to deploy properly, you’ll need a database. The BII works with Oracle, Postgres, MySQL or MariaDB. You can also run the application just for using the H2 database (we use this for testing). If your database of choice (apart from H2), you’ll need to create a database (we usually name it bioinvindex) and a user (it’s always a good idea to not just use root as the user) and grant that user all permissions to the database.

2. Grabbing the code

With everything in place, you need to ‘clone’ the BioInvIndex repository from GitHub. So navigate to a directory of your choosing, and via the command line type ‘git clone https://github.com/ISA-tools/BioInvIndex.git’. This will create a BioInvIndex directory for you with all the code inside.

3. Configure your profiles

I mentioned earlier about Maven and profiles. In the bioinvindex directory just created for you, you’ll see a profiles.xml file. Not to get too bogged down on details about what these profiles are for, I’ll give a brief explanation. The main pom.xml file (Project Object Model) for maven defines a number of dependencies, or libraries that are required for the application to run. Some of these dependencies are not always known in advance. For example, if I am running an application on MariaDB, why would I want to have Oracle and Postgres libraries in the final EAR (Enterprise Archive, the JBoss answer to WAR files in Tomcat)? The Profiles just allow us to automatically inject some properties in to the pom file on build depending on what the person building it wants to run. Some of these profiles also go towards creating the hibernate.properties file required by hibernate for connection to the database or in specifying to the application the whereabouts of the Lucene index (will talk more about that in a bit).

So now, given you have some context, open profiles.xml up and you’ll find a number of individual ‘profile’ elements for the various database installations and a few for the Lucene index locations.

First, find the profile matching your database and edit the username and password, database name (if not bioinvindex), URL and any version information, etc.

Then, modify the index profiles (named index_local and index_deploy) that specify where the Lucene index for the BII web app will reside. The Lucene index is used to speed up the web application, massively reducing the number of database queries that are required. The majority of the web application front end is based on the contents of the Lucene index. Make sure that the application has read/write access to that location.

4. Build!

Run the command mvn clean package -Dmaven.test.skip=true -Pdeploy,<your_database_profile>,<your_index_profile>

So, if I was deploying using mysql and using the index_deploy profiles, I would run

mvn clean package -Dmaven.test.skip=true -Pdeploy,mysql,index_deploy

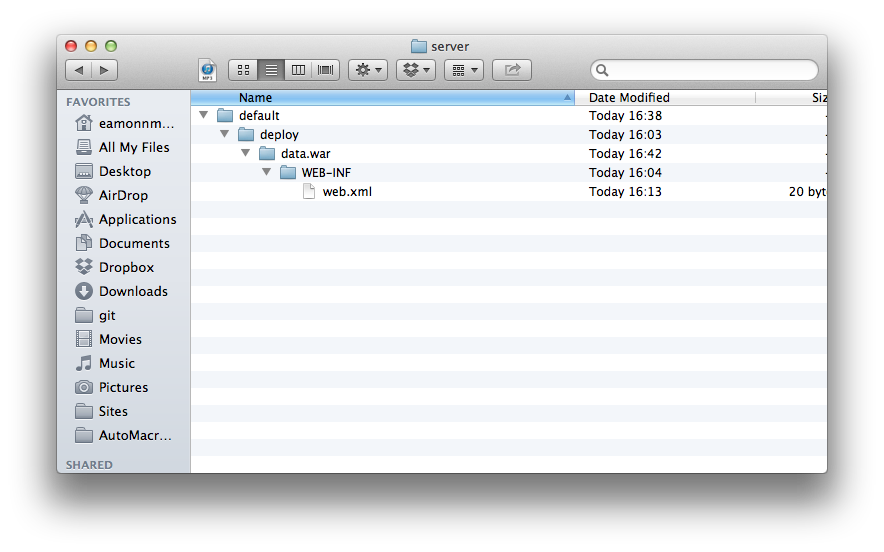
Now watch the build succeed. When it completes, look in ear/target/ and you’ll see bii-x.y.ear where x and y are the major and minor versions respectively. The ear, or enterprise archive is what you’ll be deploying. Copy this file in to your JBoss directory, so given we’ve copied the JBoss installation files to /etc/jboss-5.1.0.GA/, we’d copy the ear to /etc/jboss-5.1.0.GA/server/default/deploy/

5. Run the web application

Finally, we want to actually run our application. The next step will rely solely on JBoss. navigate to /etc/jboss-5.1.0.GA/bin/ and you’ll see a number of scripts. The only one you need worry about is run.sh – to run JBoss using the default server (that’s where we copied the ear to), execute the following command – ./run.sh -c default -b 0.0.0.0 & the last bit will bind the server to address 0.0.0.0, so it’ll be visible to the outside world and will run on port 8080 by default. You can change the port by following the guidance in this Stackoverflow post.

Image

Hopefully everything will start running, and the bii ear will be deployed and you’ll be able to see it at http://localhost:8080/bioinvindex. You will see errors in the startup log, but that’s because nothing exists in our database yet…there are no tables present at this point. We’ll create the database next.

6. Set up the database

For this, you’ll need the BII Manager. You can download this from http://isatab.sourceforge.net/tools.html. The latest version (1.6.1) is available here.

Unzip it and you’ll have a BII-Data-Manager-x.y directory with some files in it. We’ll need to configure some things before we start:

  1. Firstly, the database connection information. Open up the hibernate.properties file under the config/ directory and copy in the same username, password, database URL, index location, etc. as you entered in the profiles.xml for the BII web application.
  2. Next, you may want to set up data-locations.xml. Data locations tell the manager tool where to copy data files and ISA-Tab files as well as the URL the web application will be able to access them from. More information on the set up of JBoss to point to these data directories is available in a previous blog post.

Now, we’re ready to go. If you are using MySQL, H2, MariaDB or Postgres, you’ll be able to run the application by just double clicking isa_deps.jar or executing ./run.sh from the command line.

If you are using Oracle, you will need to add the Oracle driver on the classpath. Edit the run.sh file to do this then when ready, from the command line, run ./run.sh.

When the application starts, you’ll be presented with a log in screen. At this point, create a curator account. When this is done for the first time and the database has no schema available, the application will automatically create the schema via Hibernate (a fantastic tool). So you’ve nothing to do. Then, when that’s completed successfully (if it doesn’t check your hibernate.properties entries), you’ll be able to log in and load content.

Finally, to make things a bit faster, open up your hibernate.properties file having used the data manager for the first time and delete the line

hibernate.hbm2ddl.auto=update

This will stop the checking of the schema every time a connection is opened.

That’s it! Let us know if we missed anything, and we’ll update this post.

Configuring Links to data files in the BII web app in JBoss 5.x

We have been getting asked a lot about general deployment within the ISA tools suite, particularly with respect to the web application, which can look a little complex. Here I’m going to describe one of the more perplexing tasks when setting up JBoss: how do I configure JBoss to serve up static content, i.e. my data files. I will also cover how to set up the URLs in data-locations.xml (for the BII Manager tool) to automatically place your files in this directory.

Setting up JBoss to serve out files

Probably the most annoying part of setting up JBoss is telling JBoss to serve out your data files from the web application. For instance, the BII data manager tool has sent the files to /tmp/data/bii/ on my file system and I want the URL http://localhost/data to point to that directory. There are a number of ways you can do this. You can use Apache or nginx to do this, you could change your data directory to be within the ROOT.war directory in your JBoss server directory, or you could do what I’m suggesting here and do everything through JBoss…which I think is a bit cleaner, and not so difficult when you know how.

1. The first thing to do is modify the profile.xml file found under the server/default/config/bootstrap folder in your JBoss installation.

Image

In profile.xml, there is a bean named BootstrapProfileFactory, you need to modify this and add a value element to the java.net.URI list element. Here, I’ve added a path to my Downloads directory.

Image

2. Next, we need to set up a folder in my Downloads directory, which has to have a series of folders following the deploy pattern of  /server/<profile>/deploy/ – so now, the directory /Users/eamonnmaguire/Downloads/server/default/deploy/ should exist

3. Within the deploy directory, create a data.war directory, and inside that create a WEB-INF directory. The name of the .war directory will dictate the URL, so data.war will correspond to http://localhost/data. In the WEB-INF directory, create an empty web.xml file. It’s contents will be <web-app></web-app> – Under the /Users/eamonnmaguire/Downloads/server/ I now have the following directory structure.

Image

4. Add your files

Finally, within your data.war directory, add the files you want to display. Here I’ve added a PDF for simplicity.

Image

Start up JBoss running ./run.sh -c default and navigate your browser to http://localhost:8080/data/Diagnosis.pdf and I get this lovely page.

Image

That’s it!

Now, to configure data-locations.xml. For out ISA-Tab for example, we simply set up the filesystem_path to be where, on our machine we want the files to be distributed. The web_url will be the URL we’ve just configured that has mapped data to that actual position in the file system.

Image

New paper! MetaboLights: towards a new COSMOS of metabolomics data management

A new paper, featuring the ISA team as authors is now available to read on MetaboLights (EMBL-EBI metabolomics repository).

MetaboLights, part of the ISA commons is the new European repository for metabolomic data held at the EBI. Their infrastructure is built upon the ISA software stack, utilising ISAcreator for data entry, ISA-Tab as the format then the BII data manager and database for persistence and storage respectively.

Click here to access the MetaboLights repository.

Running ISA tools in Mountain Lion, Maverick, or Yosemite

Since Mountain Lion came out, we’ve had some users unable to run ISA tools. The reason why is down to Apple’s change in security policies. Apple now try to restrict the applications run by default on Mac OS to those downloaded from the app store. 

To change this, you need to access your security preferences. You can access this quickly through spotlight as shown below.

Image


You will then be faced with the security and privacy window and will see a section named “Allow applications downloaded from”. You need to change this from Mac App Store to Anywhere. If you are unable to change it, you first need to click on the lock icon to change it. In the end, your Security and Privacy screen should look like this.

Image


Apologies for any inconvenience caused. If you have any further queries, please email us at isatools@googlegroups.com

The ISA team.

Eamonn wins the Digital Research 2012 Developer Challenge

Eamonn won the digital research 2012 developer challenge last night in an event held at the Oxford e-Research Center. His mobile app, called BioEye, of which a prototype was built in 1 day during the event helps in disseminating better the knowledge about biodiversity in our local environments. The app and idea won in a field of 6 other competitors. Further information about this app will come soon.

For more information see: http://digital-research.oerc.ox.ac.uk/devchallenge

Introducing OntoMaton – Ontology Search & Tagging for Google Spreadsheets

We are happy to announce the release of OntoMaton, a tool which allows users to search for ontology terms and tag free text right in Google Spreadsheets. This post will serve to introduce you to the tool, how it works and how it can make it easier for users to use ontologies in a pervasive, powerful and collaborative environment, complementing existing work from our team in the creation of ISAcreator.

How it looks

OntoMaton is available from the Google Script Gallery and when installed provides a menu as shown below.

From the menu you may access two resources part of OntoMaton: ontology search and ontology tagging. There is also an ‘about’ option.

Ontology Search

Ontology Tagging

Behind the scenes: restricting the ontology search space

If a sheet named “restrictions” is in your spreadsheet, OntoMaton will consult it to determine if the currently selected column/row name has a narrowed ontology search space. This makes it quicker to search BioPortal, allows for restriction of the user’s result space to make easier the process of selecting a term.

Behind the scenes: extra information about the terms you select

For every term you select, it’s full details are recorded in a “terms” sheet. This makes it possible to use OntoMaton in any spreadsheet and all provenance information (including URIs, ontology source and version) for selected ontology terms will be immediately available for use when exposing your records to the linked data world!

Installing

To install, create a new google spreadsheet, then go to the menu tools > script gallery. In the script gallery, search for ontology or ontomaton and you’ll get the following result pane.

Click on ‘install’ and this will install the scripts inside your spreadsheet. Then there is one more and final step to follow for installation. You have to click again on tools > script manager and you’ll be presented with something like that shown in the image below.

OntoMaton contains lots of functions, but the only one you need to worry about in order to run the program is the onOpen function. Click this then click on run and the OntoMaton menu will be installed in your menu bar. From here you’ll be able to access the ontology search and ontology tagging functions.

Let us know what you think! New releases will come soon to fix any problems you may identify, please submit all ‘bugs’ and feature requests through https://github.com/ISA-tools/OntoMaton/issues

OntoMaton inherently supports ISA-Tab files too. So if you have an investigation file it will automatically add ontology sources to the ONTOLOGY SOURCE REFERENCE block. Also, if you have Term Source Ref and Term Source Accession after a column, OntoMaton will automatically populate these columns for you.

Also, the following table provides a quick review of available tools attempting to mix spreadsheets and access to vocabulary servers:

domain

automated

annotation

ontology search/lookup

versioning*

collaboration

RightField

general

ISA creator

multiomics

Proteome Harvest PRIDE

proteomics

Annotare

transcriptomics

OntoMaton

general

  • by versioning we refer to managing of user edits throughout the annotation process.

We hope you enjoy this new feature!

The ISA team

Addendum:

Safari 6 users, be aware you will have to activate the ‘developer menu’ from the Advanced Item in the Safari ‘Preferences’ menu item. Once activated, go to menu ‘Develop’ and navigate to ‘User Agent’ item and select ‘Safari 5.1.7’ for enabling the browser to work with Google Spreadsheet. (Thanks to rpyzh for reporting the issue, see here)